A ceiling stain is often the last visible sign of a much larger moisture problem. Effective commercial roof leak investigation steps do more than identify where water appeared indoors. They separate the point of entry from the point of damage, preserve evidence, and give owners or managers a defensible basis for repair decisions.
A leak may travel along deck flutes, insulation layers, conduits, or framing before it reaches an interior ceiling. That is why a quick patch at the nearest roof penetration can stop symptoms temporarily while the actual source remains active. A disciplined investigation protects the building, its occupants, and the repair budget.
Start With Safety and Immediate Damage Control
Before tracing the leak, address active hazards. Move or protect inventory, isolate wet electrical areas when appropriate, place containment beneath active drips, and document the condition before materials are moved. If water is entering a tenant space, equipment room, or area with sensitive operations, the first priority is limiting interruption and preventing secondary damage.
Roof access also requires judgment. Wet membranes, loose aggregate, ponding water, high winds, and unprotected edges can turn a routine inspection into a safety issue. Investigation should be performed by qualified personnel using appropriate access and fall-protection procedures. An unsafe roof should not be walked simply to get a faster answer.
Review the Building’s Leak History
The investigation should begin below the roof. Ask when the leak was first noticed, whether it occurs only during wind-driven rain, and whether it follows every storm or only heavy, prolonged events. A leak that appears after snow melt can point to different conditions than one that occurs during a short, intense summer rain.
Review available records, including prior repair invoices, roof replacement documents, maintenance logs, warranty information, and photographs from earlier events. Recurring leaks in the same general area deserve special scrutiny. Repeated patching may indicate that the visible defect has been treated without resolving moisture trapped within the roof assembly or a nearby drainage issue.
It also helps to identify recent changes. New rooftop equipment, abandoned penetrations, utility work, façade repairs, and changes to drainage components can all introduce a pathway for water. The timing of a leak is evidence, not a minor detail.
Document Interior Evidence Before Looking Overhead
An interior survey establishes the leak pattern. Inspect ceiling tiles, gypsum surfaces, wall finishes, mechanical rooms, upper-level corridors, and areas around roof access points. Record the location of staining, dripping, peeling finishes, corrosion, odors, and visible microbial growth.
High-resolution photographs should include close-up damage and wider views that establish the room, ceiling grid, or equipment location. Marking observations on a floor plan creates a useful reference when comparing indoor findings with roof conditions. For larger facilities, consistent room names and compass directions prevent confusion when repairs are planned later.
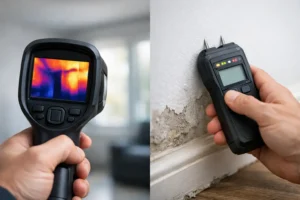
Moisture meters and thermal imaging can help identify damp materials beyond the visible stain. These tools are valuable, but results require interpretation. A thermal anomaly may reflect wet insulation, air movement, temperature differences, or a change in material thickness. Moisture readings can be affected by the material being tested. The most reliable conclusions come from correlating instrument results with visual evidence, weather history, and roof findings.
Inspect the Roof System in a Deliberate Pattern
A roof inspection should not begin by wandering toward the area above the interior stain. Because water can travel, the search area often needs to extend upslope and outward from the reported damage. Work methodically from the overall roof condition to the details most likely to admit water.
Check Drainage First
Standing water does not always cause a leak on its own, but persistent ponding accelerates wear and exposes weak points. Inspect drains, scuppers, gutters, strainers, downspouts, and surrounding low areas for blockage, poor flow, or accumulated debris. Look for evidence that water has repeatedly overtopped flashings or backed up at drainage components.
Drainage findings matter because repair priorities may change. Replacing a small section of membrane without correcting the condition that keeps water on the roof can lead to another failure in the same area.
Examine Seams, Flashings, and Penetrations
Most commercial roof leaks occur at transitions rather than broad field areas. Inspect seams, laps, terminations, parapet wall flashings, edge metal, pipe boots, curbs, vents, skylights, access hatches, and equipment supports. Look for open seams, cracks, punctures, displaced materials, failed sealants, loose fasteners, or gaps at transitions.
The roof type affects what an inspector expects to find. On low-slope single-ply systems, seams and penetrations often require close attention. On built-up or modified-bitumen systems, splits, blisters, exposed reinforcement, and deteriorated surfacing may be relevant. Metal roof investigations may focus more heavily on fasteners, panel laps, closures, sealants, and details at curbs or transitions.
A visible defect is not automatically the source. It may be old, inactive, or unrelated to the interior complaint. Findings should be described by location, condition, likely significance, and the level of confidence that they explain the observed water intrusion.
Use Testing Carefully When Visual Evidence Is Not Enough
When the source remains uncertain, controlled testing can narrow the possibilities. Moisture surveys may help identify wet insulation or affected roof areas. Infrared scans are often most useful when temperature conditions create a clear contrast between wet and dry materials. Targeted water testing may isolate a particular flashing, seam, curb, or penetration.
Water testing should be staged and documented. Apply water to one detail at a time, allow enough observation time, and avoid flooding multiple areas simultaneously. Otherwise, a test can create more uncertainty than it resolves. Testing may also be unsuitable during freezing conditions, when the roof surface cannot be accessed safely, or when active weather makes results impossible to control.
In some cases, limited exploratory openings are the only practical way to confirm moisture below the membrane. This is a trade-off: openings can provide strong evidence, but they should be planned so they can be properly repaired and do not create additional exposure.
Distinguish the Leak Source From the Repair Scope
A reliable report should make a clear distinction between confirmed conditions, probable causes, and conditions that need further evaluation. It should also separate the immediate action needed to stop water entry from the broader work needed to restore affected materials or improve long-term performance.
For example, a failed pipe flashing may be the immediate source, while widespread wet insulation around that penetration changes the repair scope. Likewise, debris blocking a drain may be the trigger for a water event, but deteriorated flashing at the drainage area may be the underlying vulnerability. Clear documentation keeps owners from approving a repair based on an incomplete picture.
For insurance, warranty, tenant, or legal matters, dates, weather context, labeled photographs, test methods, and precise observation locations are especially valuable. The report should avoid overstating conclusions where evidence is limited. Accuracy carries more weight than certainty that the conditions do not support.
Prioritize Repairs by Risk, Not Just Appearance
After the investigation, rank actions based on active water entry, occupant safety, potential damage to equipment or finishes, extent of confirmed moisture, and the likelihood of recurrence. An active leak above a server room or electrical distribution area deserves faster action than an old stain with no elevated moisture readings, even if the stain looks more dramatic.
Archer Professional Inspections approaches these assignments with the goal of turning field observations into clear decision support. A well-organized evaluation gives property teams the information needed to coordinate qualified repairs, preserve records, and monitor whether corrective work actually resolved the issue.
The best time to investigate is while the evidence is still present. Photograph the leak, record the weather conditions, protect the interior, and resist the urge to treat a ceiling stain as the whole problem. A careful investigation can turn a recurring surprise into a manageable maintenance decision.